“An artist is only as good as their preparation.” – Unknown.
When starting your journey in drawing and painting, having the right materials is essential, just as a builder needs the proper tools to complete their work. Avoid wasting time, energy, and patience—especially when the quality of your materials and the lack of preparation can significantly affect your efforts. Make sure you have all the necessary supplies on hand. It’s pointless to reach your full potential for focus and creativity only to realise that you are missing a few brushes or have run out of oxide red paint.
Our list highlights essential supplies explicitly chosen to facilitate a seamless connection between your mind, hands, and the surface on which you work. We’ve also included explanations for some items to clarify their functionality.
The short summarised list refers to experienced individuals, whereas the detailed version is mainly for beginners who may not know where to start. Some materials include links to help you understand their uses and provide approximate price estimates.
We have also provided more detailed information about materials for charcoal drawing and acrylic painting for those seeking additional information.
CONTENTS
SUMMARISED LIST – EXPERIENCED
Any paper brought mustn’t exceed the dimensions of 50 x 70 cm.
Experienced artists are usually familiar with their preferred drawing and painting materials. Therefore, we will focus solely on the painting essentials they must bring for our sessions. Please note that oil paints and solvents are not allowed for this session due to their long drying times and fumes.
1. Aluminium foil,
2. Masking tape,
3. And soap to thoroughly clean their brushes.
Please read the detailed list if you have a moment. We’d appreciate your suggestions in the comments section.
DETAILED LIST – BEGINNERS
ESSENTIAL DRAWING MATERIALS
Brand: Talens, Coates
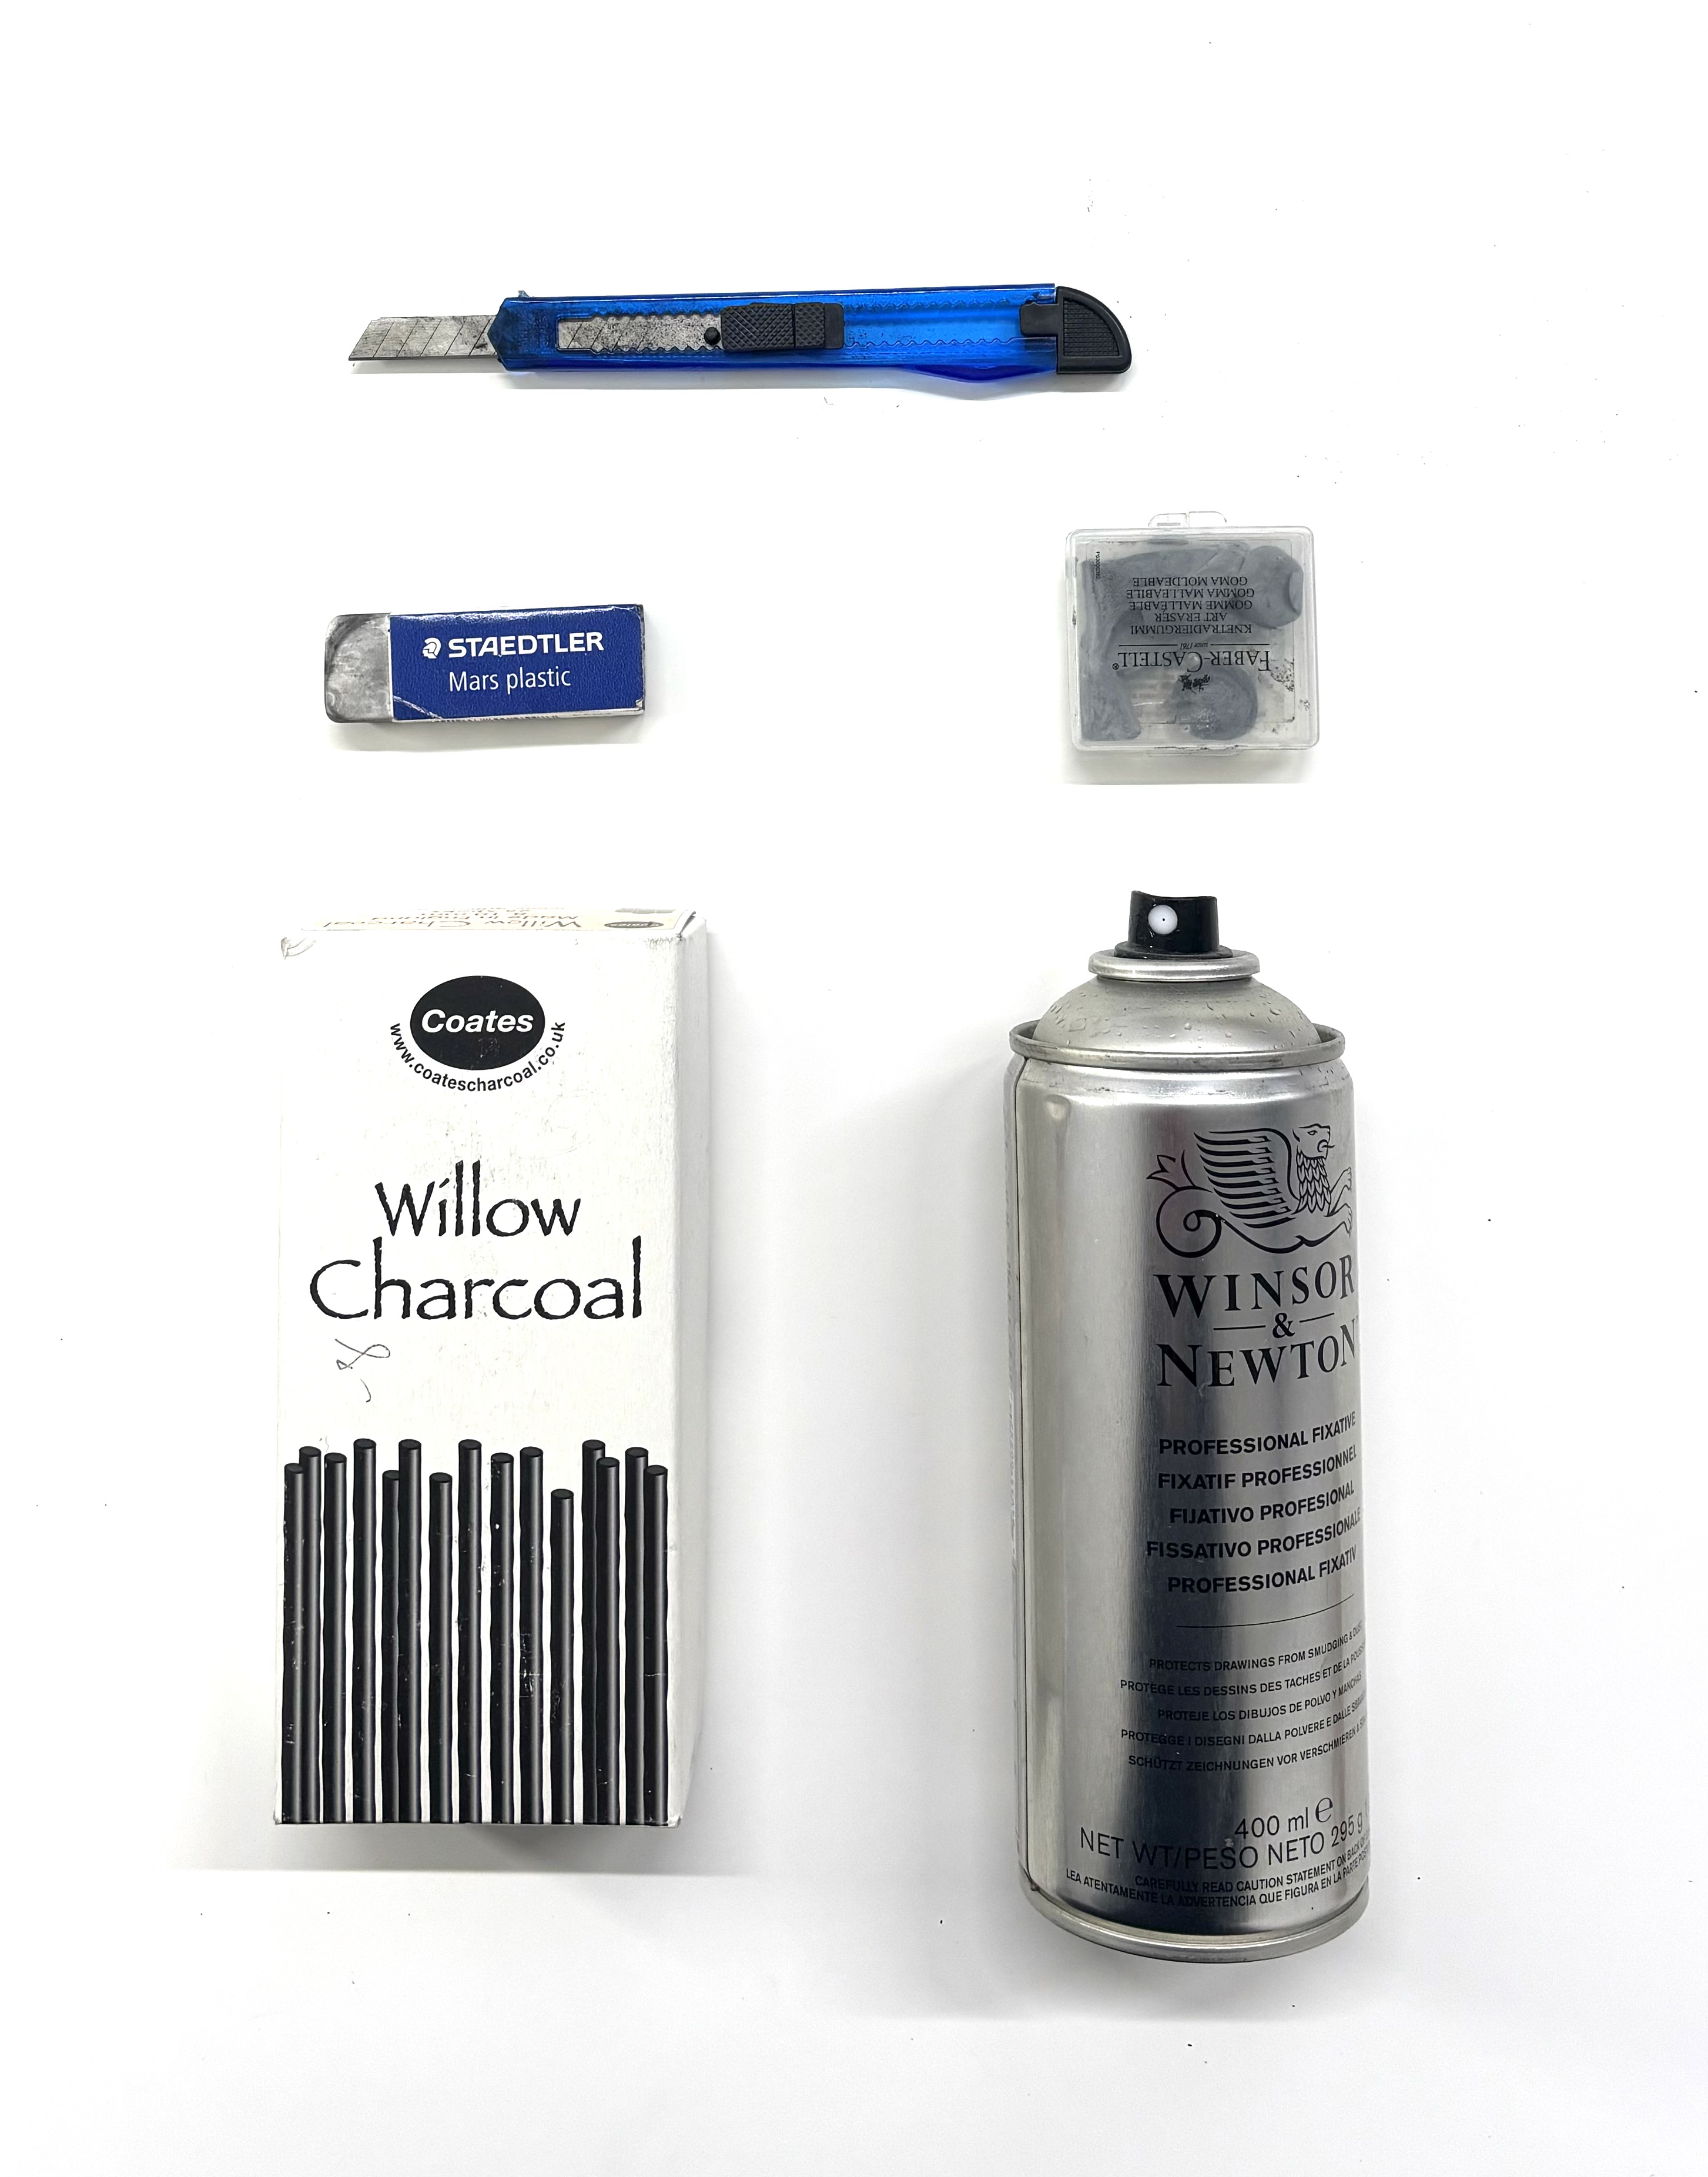
Quantity: 1 Box of 12 x Thick Sticks 7-9 mm, 8- 10 mm, or 7- 12 mm. (not thin <7 mm)
Details: the mm refers to the diameter of the stick.
Brand: Fabriano 4 Cartridge
Quantity: 25 papers of 200 gsm 50 x 70 cm, NOT SMOOTH (SKU FA4C02193)
Details: GSM: grams per square meter of paper, a metric used to measure the weight of paper. The higher the GSM, the heavier and thicker the paper is. SKU stands for “stock keeping unit” and is a unique alphanumeric code retailers use to track inventory and find products.
Brand: Any
Quantity: 1
Details: Sharpening of the charcoal stick – you can find them in any art and DIY SHOP
Brand: Faber-Castell Kneadable Eraser, Eberhard Faber kneadable eraser
Quantity: 1
Details: A kneadable eraser is a soft, pliable eraser that artists use to remove graphite, charcoal, coloured pencil, or pastel marks from paper.
Brand: STAEDTLER Mars Plastic Eraser
Quantity: 1
Details: A hard plastic eraser, also known as a vinyl eraser, is a tough eraser that can erase various materials, including charcoal, graphite, ink, and coloured pencil.
Brand: any
Quantity: 1 x 450ml
Details: Fixative spray is a clear liquid or aerosol that protects and preserves artwork made with dry media, like charcoal, chalk, pastel, or graphite.
ESSENTIAL PAINTING MATERIALS
Acrylic Colours:
Titanium white,
Ivory black,
lemon yellow, cadmium yellow,
cadmium red, Carmine red,
red vermilion,
cobalt blue, ultramarine blue, cerulean blue,
yellow ochre
Burnt Sienna,
raw umber
Viridian green.
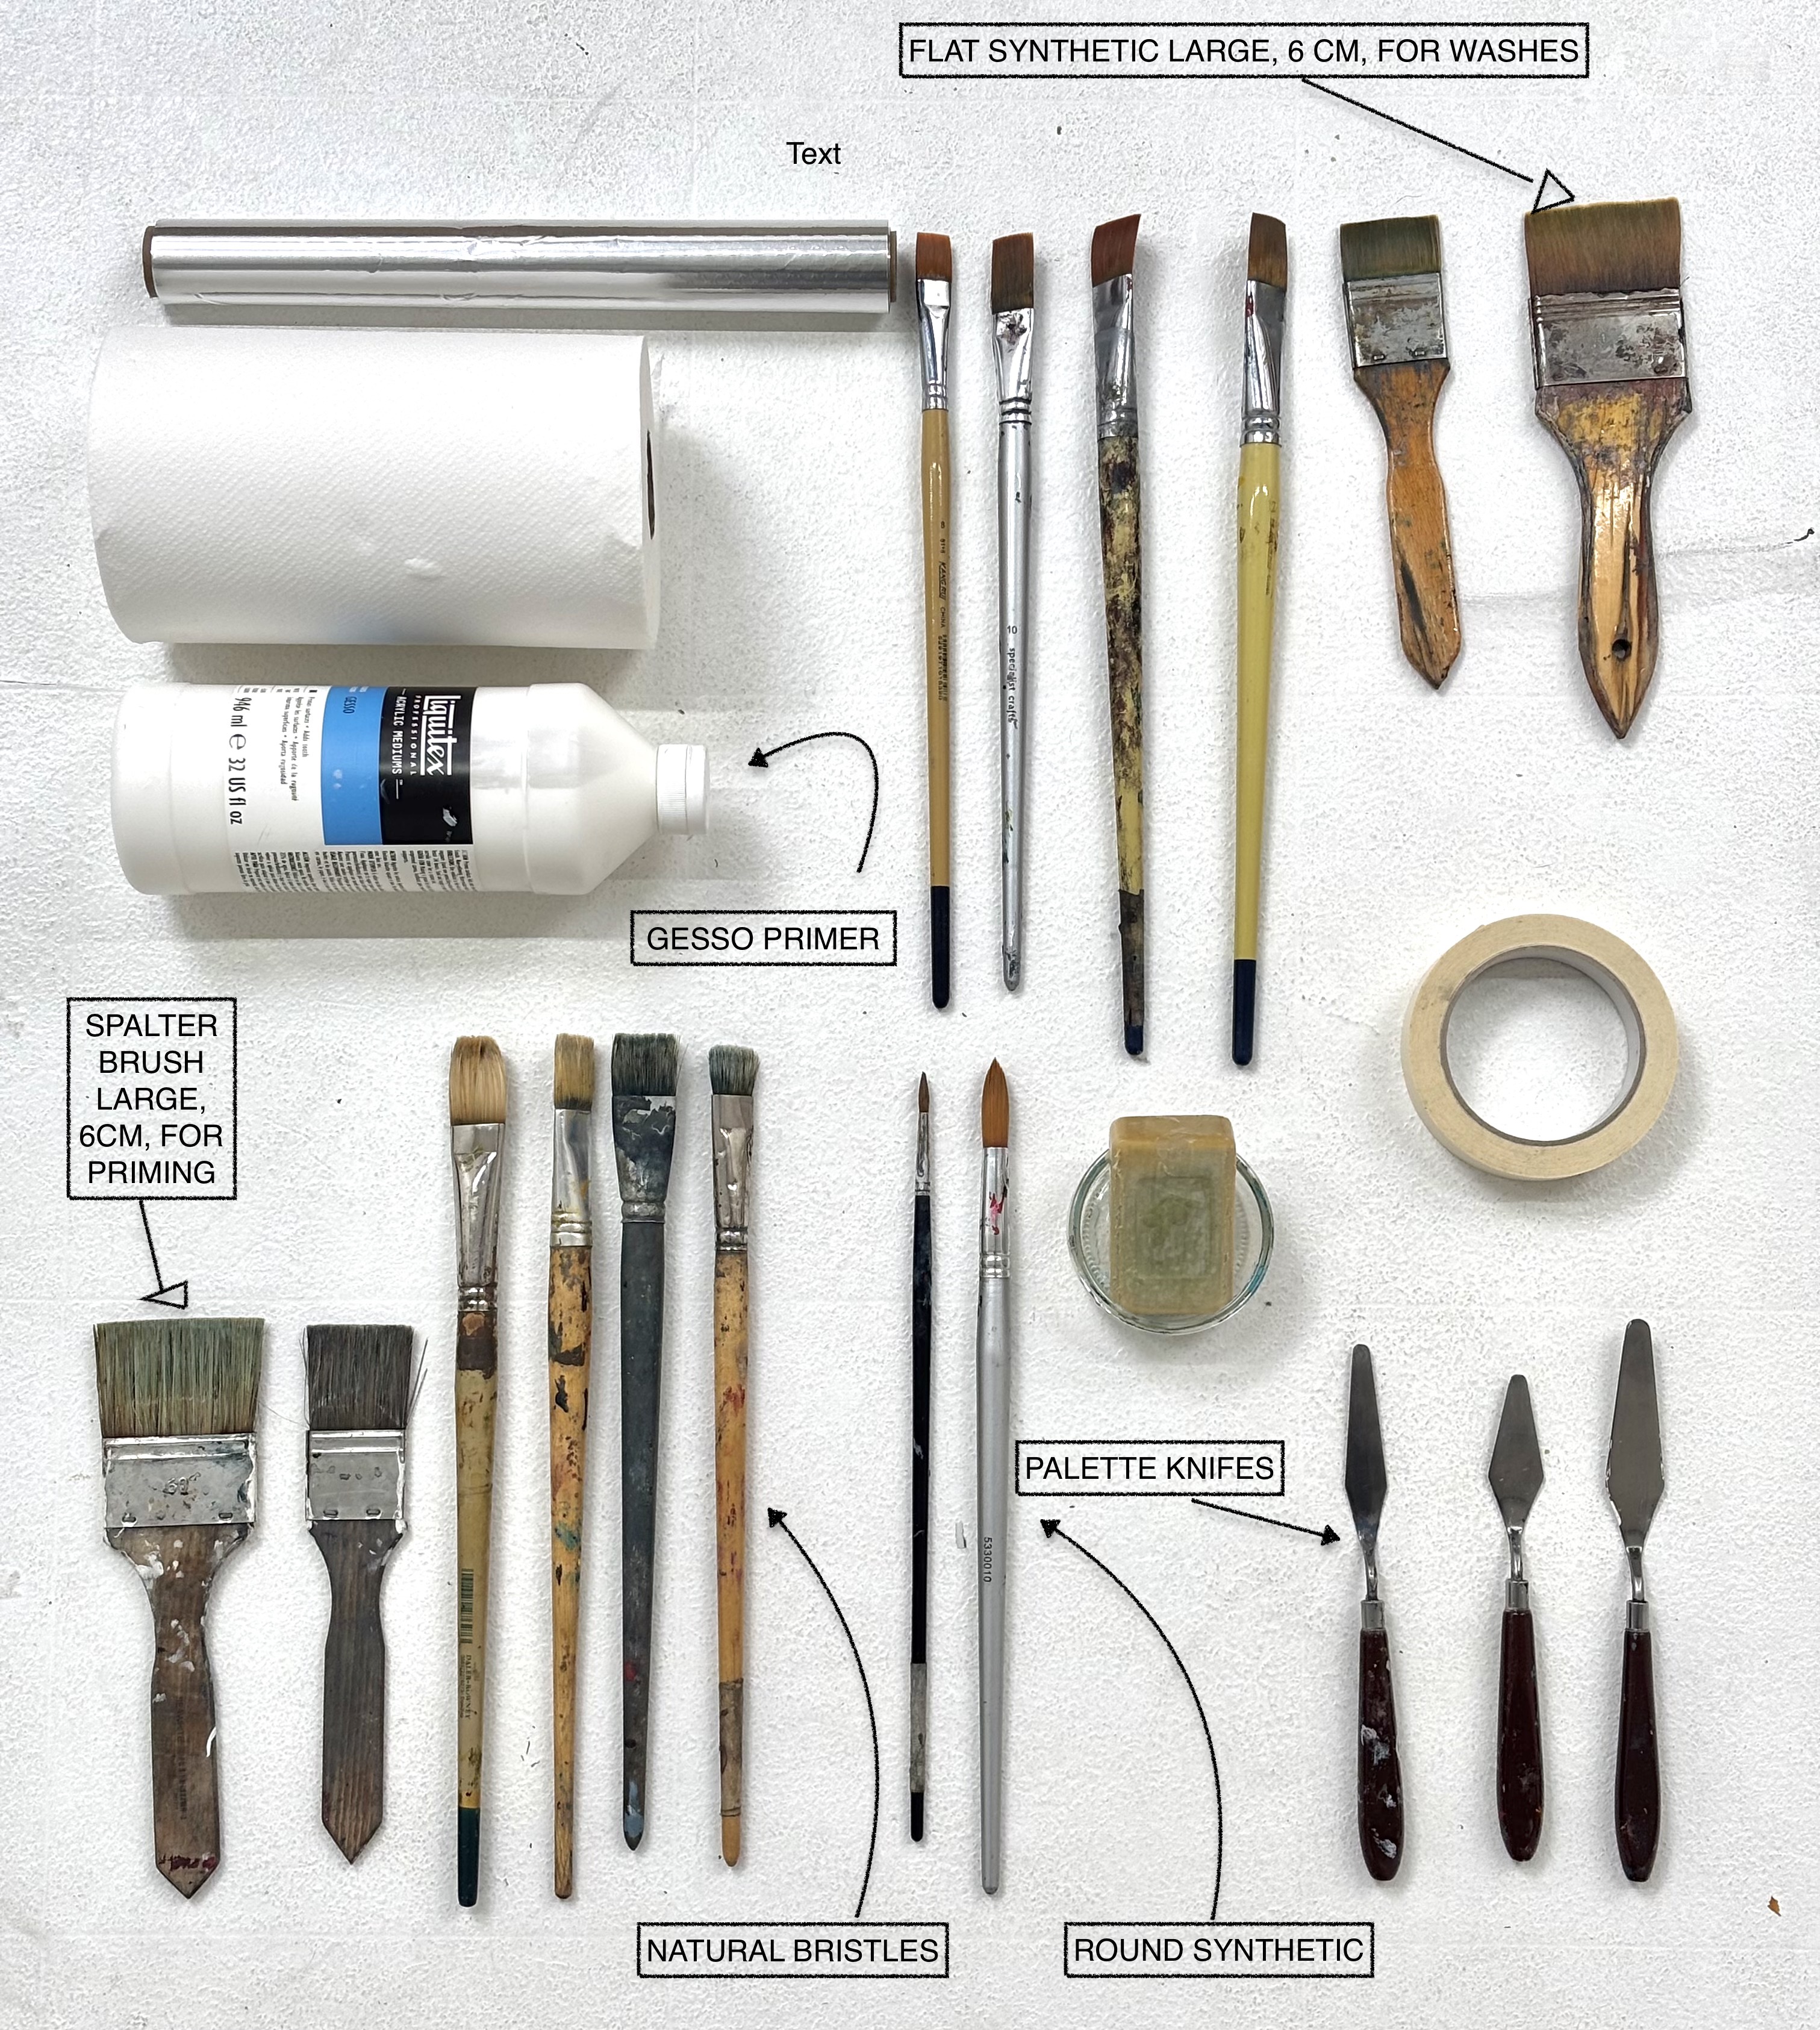
Brushes: Divided into two categories: synthetic (fine stroke, precision, increased control, shaping) and natural bristle brushes( bristle hogs, which create less precise strokes and carry more colour load). You will need a bit of both “worlds”(synthetic and bristle hogs). These come in various sizes, numbers and shapes.
8 – 10 flats. (half bristle – half synthetic)
2 round synthetic brushes.
Add a couple of white bristle spalter brushes for priming paper with gesso primer.
Gesso primer: Gesso is a versatile primer used on canvas and other surfaces to create a smooth foundation for paint.
Paper: Specially designed to sustain wet medium, 50 x 70 cm size. (Cartridge paper more than 300 gsm, Canson, Montval, Strathmore and many other options)
Palette knives: Palette knives are versatile tools in painting for mixing colours and adding texture with thick layers of paint.
Masking tape
Kitchen roll
Aluminium foil: 45cm width – it will be used as a palette to mix your colours (you can find cheap ones at any Poundland shop)
Soap+container or liquid soap (baby shampoo, fairy).
HOW TO CLEAN YOUR BRUSHES
Gather Your Supplies:
Clean water
Soap or brush cleaner (mild liquid soap, baby shampoo, or specialised brush cleaner)
A bowl or container for rinsing
A clean cloth or paper towel
A reshaping tool (like brush guards or plastic wrap, if necessary)
Rinse Immediately:
After using your brushes, rinse them under lukewarm running water as soon as possible. This prevents paint from drying and hardening in the bristles.
Apply Cleaner:
Pour a small amount of soap or brush cleaner into your palm or a bowl. Dip the brush into the cleaner, then gently swirl it around to work the soap into the bristles.
Gently Clean the Bristles:
Use your fingers or a brush cleaning tool to work the soap through the bristles gently. Avoid bending or pulling on the bristles, as this can damage them.
Rinse Thoroughly:
Rinse the brush under running water, ensuring all soap and paint are washed out. Keep rinsing until the water runs clear.
Shape the Brush:
After rinsing, gently reshape the bristles back to their original form. If using a brush guard, place it on the brush to help maintain shape during drying.
Dry Properly:
Lay the brushes flat on a clean towel to dry. Avoid standing the brushes upright in a container while wet, as water can seep into the ferrule (the metal part that holds the bristles), weakening the adhesive and leading to bristle loss.
Store Your Brushes:
Once dry, store your brushes upright in a holder or flat in a drawer. Keeping them in a safe place helps maintain their shape and longevity.
By following these steps, you can ensure your art brushes remain in excellent condition, allowing you to create beautiful works of art for years to come!
CHOOSING YOUR MATERIALS
We strongly recommend not compromising on the quality of your artistic materials. If your budget permits, it’s best to avoid low-cost options, as they can significantly impact the quality of your work. To illustrate this point more clearly, let’s look at a couple of specific examples.
Cheaper Colors: While purchasing less expensive paints or colours might be tempting, they typically contain a lower pigment concentration and have a more watered-down texture. This means they lack the necessary coverage that more expensive, higher-quality colours provide. Consequently, your artwork may appear washed out or uneven, resulting in a final piece that does not meet your standards. Quality colours not only deliver richer tones but also enhance the vibrancy and depth of your work, allowing for greater expressive possibilities.
Low-Cost Brushes: At first glance, inexpensive brushes may seem like a practical choice, and they might even look appealing when you see them in the store. However, a crucial factor to consider is how they perform during use. Once you immerse a low-cost brush in water, you’ll quickly notice that the bristles lose their finely shaped tips and become frayed or misshapen. This deterioration diminishes your ability to create detailed strokes and can lead to frustration as you try to achieve the precision needed for your artwork. In contrast, investing in high-quality brushes ensures better control, durability, and a superior finish in your creative endeavours.
Overall, the suitable materials play a vital role in achieving the best possible outcomes in your artistic projects. Opting for quality over quantity reinforces your commitment to your craft and significantly enhances the impact of your artistic expression.
DETAILED APPROACH TO CHARCOAL-RELATED DRAWING.
Choosing the right materials for charcoal drawing can significantly enhance your creative expression and the overall quality of your artwork. Here’s an in-depth look at the various components to consider:
1. Types of Charcoal
Vine Charcoal: Made from burnt willow or grape vines, vine charcoal is lightweight and soft, making it easy to blend and erase. It comes in various grades, from soft to hard, allowing for a range of tonal values. It’s excellent for sketching and creating initial outlines.
Willow Charcoal: It is favoured by artists for its smooth texture and rich black tones. Made from willow trees, it allows for easy blending and shading, making it ideal for drawing. Unlike other charcoals, it produces softer lines that enable a range of effects, from fine details to broad strokes. Its lightweight nature makes it easy to transport, making it a popular choice for outdoor drawing.
Compressed Charcoal: This type is made from charcoal powder mixed with a binding agent. It produces darker, more intense lines and is ideal for final details. Compressed charcoal comes in sticks of varying hardness, enabling artists to create bold lines and rich textures.
Charcoal Pencils: These pencils combine the convenience of a typical graphite pencil with the richness of charcoal. They are great for detailed work and can be sharpened to a fine point, allowing for precision in your drawings.
2. Papers
Weight and Texture: Choose a heavier paper (minimum 150 gsm) to handle the weight of the charcoal. Textured surfaces, like charcoal paper or pastel paper, give the charcoal more grip, allowing for smoother blending and layering. The paper’s texture can influence the final appearance of your work—rougher textures lend themselves to expressive strokes, while smoother surfaces are better for fine details.
Color: While the white paper is traditional, experimenting with coloured or toned paper can create interesting contrasts and add depth to your artwork. Toned papers can come in greys, browns, or other hues, allowing you to use the paper as a mid-tone in your drawing.
3. Blending Tools
Blending Stumps and Tortillons: These tools are essential for blending and smoothing out charcoal marks. A blending stump (a tightly rolled paper stick) can create soft transitions, while a tortillon (a tapered version) is better for finer details and controlled blending.
Fingers: Many artists prefer to use their fingers for blending, which can create a more organic feel. Just remember to keep your hands clean to prevent smudging where it’s not desired.
4. Erasers
Kneaded Erasers: These are versatile and can be shaped for various uses, from erasing large areas to lifting out fine details. They are handy for creating highlights or softening edges.
Vinyl or Plastic Erasers: A firmer eraser is beneficial for more precise charcoal removal. Lightweight and effective, these erasers are excellent for correcting mistakes or creating sharp lines.
5. Fixatives
Workable Fixative: Once your drawing is complete or you want to preserve certain areas, a workable fixative can be sprayed over your artwork to prevent smudging while allowing you to continue working. It’s essential to use this sparingly, as overuse can dull the vibrancy of your work.
Final Fixative: After finishing your piece, applying a final fixative helps protect your drawing from dust and deterioration. Choose a clear spray that does not alter the appearance of the charcoal.
6. Safety Considerations
Ventilation: If you work with fixatives, ensure your workspace is well-ventilated. The fumes can be harmful in enclosed spaces.
Dust Management: Charcoal can create significant dust, which may concern your health, especially for those with sensitivities. Consider using a mask or working in a well-ventilated area to minimise inhalation.
7. Personal Preferences
Experimentation: Every artist has different preferences, so don’t hesitate to try different types of charcoal, papers, and tools. Experimentation can lead to discovering new techniques that suit your style.
Practice and Application: Ultimately, how you choose to use your materials can affect your drawing style. Spend time practising different techniques—experiment with hatching, cross-hatching, shading, and blending to find what works best for you.
Conclusion
Choosing your charcoal drawing materials thoughtfully can significantly enhance your creative outcome. By understanding the different types of charcoal, selecting the right paper, and using appropriate blending and erasing tools, you can create a wide range of effects and expressions in your artwork. Remember, practice and exploration are key to mastering charcoal, so enjoy the journey of finding what works best for you!
DETAILED APPROACH TO ACRYLIC-RELATED PAINTING
When it comes to painting with acrylics, the materials you choose can greatly influence your artistic process and the outcome of your artwork. Here’s a detailed overview of key material choices:
1. Surface/Support
Canvas: It is often available in pre-stretched and pre-primed varieties. Stretched canvases are common for their ease of use, while canvas boards are a more affordable alternative.
Paper: Acrylic paper is designed to handle water and heavy paint applications. Watercolour paper can also be used for acrylics, but it may warp if too much water is applied.
Wood Panels: Birch and masonite are popular choices. Panels offer a smooth, sturdy surface for detailed work and are less prone to warping.
Acrylic Boards: These are clear or frosted, providing a unique surface that can create interesting effects.
2. Acrylic Paint
Heavy Body Acrylics: Thick and buttery, these paints hold their texture well and are ideal for impasto techniques.
Fluid Acrylics: Thinner and more liquid, these are excellent for glazing, washes, and fine detail work.
Open Acrylics: Designed with a slow-drying formula, these allow for blending over extended periods, making them suitable for techniques similar to oil painting.
Heavy Body vs. Soft Body: The former maintains brushstrokes better, while the latter flows more easily from the tube.
3. Brushes
Bristle Brushes: These are stiff brushes, effective for applying heavy paint and textures.
Synthetic Brushes: These are versatile and come in various shapes and sizes. They are excellent for smooth applications and detail work.
Flat vs. Round Brushes: Flat brushes are great for geometric shapes and bold strokes, while round brushes are perfect for details and fine lines.
Fan Brushes and Palette Knives: Used for effects, texture, and special techniques.
4. Palette
Wood, Plastic, or Glass Palettes: Choose based on your preference for cleanup and paint manipulation. Glass palettes allow easy scraping and cleaning, while wood provides a more traditional feel.
5. Mediums & Additives
Gel Mediums: Used to thicken paint, retain brushstrokes, or add texture.
Matte/Gloss Mediums: These mediums alter your paint’s finish, giving it a matte or glossy look.
Retarder: Slows drying time, allowing more time for blending.
Varnish: A clear varnish can protect the surface and enhance the colours after the painting dries.
6. Other Tools
Spray Bottles: For misting water onto paint or surfaces to keep them moist during extended sessions.
Stencils and Sponges: For creating textures or patterns.
Rags and Paper Towels: Essential for cleaning brushes and managing spills.
7. Water
Water is essential for thinning paint and cleaning brushes. However, too much can lead to washes that reduce pigment intensity, so finding a balance is key.
Tips for Choosing Materials:
Experimentation: Different materials yield different results. Don’t hesitate to try new brands or surfaces to find what suits you best.
Quality Matters: Investing in higher-quality paint and tools can result in better application and finished results.
Test Swatches: Before starting a large piece, create test swatches on your chosen surfaces to see how the paint behaves.
By considering these choices carefully, you can enhance your acrylic painting experience and achieve impressive results.
ART STORES
In this section, we would like to share several helpful resources from renowned art stores in London. We have no financial ties or profit relationships with the art stores listed below.
Leave a Reply